The Problem with Grocery Store Tomatoes
It’s generally believed that grocery store tomatoes taste so terrible because they aren’t vine ripened. Yet, this is only part of the story.
There are many forces which conspire to drain the flavor right out of the tomatoes you find at your local grocery store. Farmers typically choose varieties which produce over a short window of time (determinate), are disease tolerant, have thick skin, and which stay firm over a long time. Why? So that the fruit survives long distance shipping and storage. In Florida, tomato quality grades are judged by uniformity of shape, size, and color. Flavor is not a factor at all.
The vast majority of tomatoes are picked green and shipped thousands of miles to an ethylene gas processing facility to forcibly ripen them to a pale pink. Even “vine ripened” tomatoes are picked mostly green with a hint of pink on the bottom. This is called breaker stage 1. Any last bastion of flavor is lost during the final insult — a long voyage in a refrigerated truck. By the time you pick up that chilled package of tomatoes for $3.99 at the Sack-n-Save, you may as well be buying pink baseballs.
It is no wonder that tomatoes are the Number One vegetable grown in the home garden!
Tomato Myths Debunked
There is a lot of questionable ‘advice’ out there about tomatoes, especially for Texas. Here’s a few myths we can bust right off the bat:
Myth #1: You can’t grow a good tomato in S.E. Texas.
Fact: For the most part, all the same rules and advice to growing tomatoes that apply elsewhere also apply to Texas, it’s just that our window of opportunity is much smaller. It’s a myth that we have a long tomato growing season. Actually, we have an extremely short one — comparable to parts of Canada. Tomatoes are generally set in the ground the first week of March, and the plants are completely spent by mid-July. That’s less than 120 days! If you put out seedlings that are too small, or you are a few weeks late getting started, your harvest will be greatly compromised!
Myth #2: You should only grow special heat setting hybrid tomato varieties.
Myth #3: Beefsteak tomatoes cannot be grown in S.E. Texas.
Fact: We have found that if you plant large transplants early enough, in the right conditions, almost any tomato variety can be grown successfully here. Besides, most heat setting varieties don’t taste very good!
Myth #4: Tomatoes don’t grow well in containers.
Fact: Even the fussiest tomato varieties can be grown and produce as well in containers they do in the ground, if they are given the right size pot, the right care and nutrients. See our Container Gardening article for tips.
Myth #5: You should grow “disease resistant” varieties.
Fact: Since the 1950’s, scientists have been breeding tomatoes to be productive, disease tolerant, and thick skinned to stand up to shipping. Much of this research on disease tolerance has focused on soilborne diseases such as Fusarium and Verticillium Wilt (represented by F and V in the name). However, these are not problems common to S.E. Texas. Root Knot Nematodes are a problem for some folks here with sandy soil, but there are solutions for that other than limiting yourself to only tomatoes with an “N” following the name.
The biggest disease problems that most of us in S.E. Texas face are Early Blight, Septoria leaf spot, and Anthracnose fruit rot, etc. for which there are very few hybrids which are tolerant to those problems. In short, trying to grow special tomato varieties for our area is not really necessary. Check out both our Tomato Varieties, Pests, and Diseases articles for more information.
The Right Dirt
The heavy clay and “gumbo” soils prevalent in S.E. Texas provide a poor medium for growing tomatoes. Even if you dig a hole and replace it with excellent soil, you are just creating a “bowl” of good soil that will fill up with water every time it rains. Tomato roots, like most plant roots, require not only nutrients and water, but also oxygen for respiration and will rot if left in standing water for even a few hours.
Other S.E. Texas gardeners have discovered that they have the opposite problem — their backyard resembles a beach. Soil made up primarily of sand will drain too well and will also encourage nematodes.
We recommend rising above these soil issues with raised bed gardening.
A Good Foundation
If you choose to make your raised bed out of lumber, we suggest pressure treated wood. This type of wood has not been treated with arsenic for many years and so is safe for vegetables. Untreated wood will start to rot within one year and may fail by the second year due to termite activity. Pressure treated wood will last 3-5 years.
Resist the temptation to build a giant raised bed. A large raised bed over four feet in width may be tempting, but then you’ll need to step into the soil to reach all your plants. We prefer to build manageable raised beds no wider than 4′ in one direction, so that you can reach into the center of the bed and tend to your plants without compacting the soil.
A 3′ x 12′ raised bed will comfortably handle 6-8 large tomato plants. All you need to start your raised bed garden is two 2″ x 10″ x 12′ boards, a 2″ x 10″ x 6′ board cut in half, and a box of galvanized wood/deck screws. Remember, you need a space to walk around your plants and/or allow a lawnmower to pass. Ideally, you want to leave at least two feet of walkway between your beds, in order to tend to your plants and harvest.
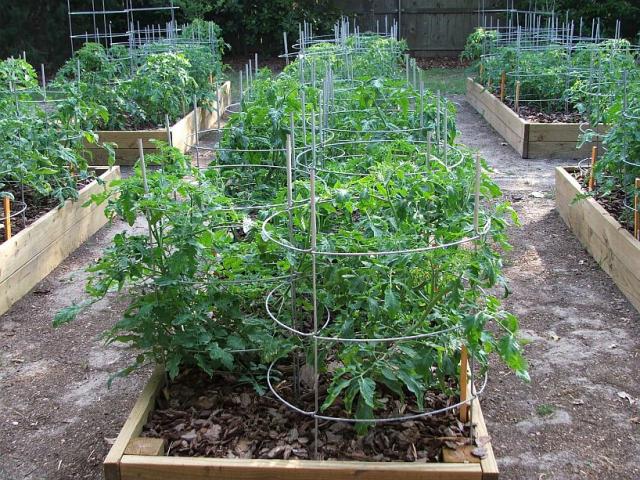
3′ x 12′ beds with 8 plants per bed, staggered/zig-zag planting
The Grass is Greener…
If like most of us, you want to replace some of your lawn with a garden, you’ll need to remove the grass first. If you have St. Augustine grass, you may be able to eliminate it by laying out black plastic or just building your garden bed on top, covering it with inches of soil. However if you have Bermuda grass, you will need to completely remove it to have any hope of a successful garden.
Renting a sod cutter will set you back $50, which is a lot cheaper than the chiropractor and also takes a lot less time. If you’ve got a month or two before planting season, you could use Roundup or a similar herbicide to wipe out the grass, although it can be tricky to apply in straight lines. One way or another, your grass (which is really a cultivated persistent weed) has gotta go.
Fill ‘er Up
Garden beds always take twice as much soil to fill as you think they need. A 3′ x 12′ bed filled to a depth of 8 inches requires 24 cubic feet of soil. Potting soil and potting mix are some of the best soil ingredients, but are also very expensive in the quantities necessary to fill such a bed. If you can find it, Premier Pro-Mix is the most cost-effective bagged potting mix (4 cubic feet compressed for $10~12). Peat moss is a good ingredient for providing good drainage, although you will need to add a little dish soap to get this normally hydrophobic material to absorb water. You can also bulk up your soil with a small amount of dye-free shredded pine bark or sandy topsoil as filler if need be. If you have a wholesale soil company in your area, you may be able to have pre-mixed garden soil delivered in bulk quantities starting at 3 cubic yards (which will fill 3 raised beds). Do your homework! Some soil yards are better than others.
Tip: Freshly cut wood chips can be a poor addition to your soil as their decomposition may temporarily “lock up” nutrients which would otherwise be available to your plant roots.
Tip: Dyed mulch such as Super-Red, Super-Black, or any unnaturally colored mulch can burn your plants. Use undyed mulch.
Compost
The most important ingredient in your raised bed gardens is compost. Compost is partially or completely broken down organic matter, and provides organic material to feed the plants and create healthy soil. Beware the $1 bags of “composted manure”, “compost”, or “composted humus” you find at local home improvement stores and retailers, as they are often little more than the soil scraped off a vacant lot, plus rocks, sand, and other mystery ingredients. Black Kow composted manure is $4.50 a bag, but it is 100% compost and a 3′ x 12′ bed needs only 3-4 bags in the first year and 1-2 bags each year thereafter. Composted sheep or horse manure, as well as fresh rabbit manure, shredded leaves, composted rice hulls, leaf mold compost, and cotton burr compost are also excellent products if you can find them.
Tip: Fresh horse manure should be allowed to age for at least 2 months before you plant your tomatoes. If your garden beds are idle in December or January, you can add fresh horse manure and it will have time to break down before you till it under.
Timing Is Everything
March or April is much too late to buy a 6-pack of tiny tomato transplants from a big box store. In mid to late February, you should be on the lookout for large (8-12″ tall) transplants from reputable local nurseries, or better yet grow your own transplants from seed! Tomato plants should be planted out as soon as overnight temperatures are predicted to stay above 40°F for 7 days. Some years, we can plant as early as February 21st. Others, we have to wait until March 15th. If you wait until all danger of frost has passed, usually late March or early April, you will greatly reduce your chance of getting a good harvest.
The single most important thing you can do as a tomato grower in S.E. Texas is to plant early, and then protect your plants from cold.
We now recommend transplanting your plants, installing your soaker hoses, placing your tomato cages, and then wrapping your tomato cages with summerweight Row Cover at planting time. This sounds like a lot of work, but by adding row cover from the very beginning, you provide an insulated blanket to your plants that you can open on warm days and close up before cold weather to trap in heat and protect your plants. Binder clips from your local office supply store are easiest for clipping the row cover into place. We’ve also seen a noticeable improvement in growth rate on plants as they are 5-10 degrees warmer than the surrounding area. We wait to remove this row cover until mid-April or once all danger of frost is gone.
If the worst happens and overnight temperatures are predicted to drop below 38, be prepared with blankets, tarps, or row cover to protect your plants. If you are a night owl and temperatures drop to the danger zone of 36 degrees or so, you can mist your plants with a hose attachment as a last-ditch attempt to keep them from freezing. Misting can not only warm the plants, but will temporarily warm the surrounding air by 2-3 degrees. Remember, the coldest part of the night is typically just before dawn.
Walls of Water are a frequent recommendation for protecting tomato plants from cool weather. However they are expensive, tricky to set up, and if the wind picks up, they can fall over and crush your plants. Further, the frosts which are the most damaging usually strike when the plants are 2-3 feet tall. Walls of Water are only 18″ tall.
WARNING: Local T.V. weather casters and radio announcers tend to provide rather inaccurate forecasts — we no longer trust them. They tend to report the coldest temperature for the day ie. just before midnight. Yet the coldest part of any night is typically just before dawn. You should consult a reputable weather website such as Weather Underground or NOAA before making any decisions about whether to protect plants or not.
A Tomato is a Tomato
If you contact your county extension service about growing tomatoes, you will likely receive recommendations for productive commercial hybrid varieties such as Celebrity, Better Boy, Sunmaster, Bingo, or something starting with BHN and a 3 digit number. This is the same advice they offer to large scale farmers. However for the home garden, we prefer to grow tomatoes for flavor and those varieties just don’t deliver for us.
It can be a challenge to select the right tomato varieties that balance between the best tasting and best producing for S.E. Texas. Typically, seedlings of our favorite tomato varieties aren’t sold at the big box stores. Fortunately, most major cities in S.E. Texas have a great selection of local nurseries with countless tomato varieties to choose from. Please check out our Tomato Varieties and the Recommended Vendors articles for recommendations and where to find seeds and/or plants.
Starting from Seed
Although there are some good sources to buy great tomato transplants in Houston, Austin, Dallas, and San Antonio, sometimes the only way to grow your favorite varieties is to start your own seeds. We sow seeds indoors in late December to mid-January and grow them for 6-8 weeks under fluorescent lights before preparing them for the outdoors. Plants which were started indoors must be gradually introduced to sunlight. This process is called hardening off and takes 5-7 days.
Check out our extensive Starting from Seed article for detailed instructions.
Feed Me
Before your plants go in the ground, you’ll want to prep your soil. This includes the application of fertilizers such as TomatoTone, GardenTone, or other fertilizers with numbers tailored to tomatoes. We don’t use Miracle-Gro or anything with high numbers like 14-14-21. Indeed, a good tomato fertilizer might have numbers like 2-5-6 with low nitrogen (the first number). A small amount of dolomitic lime might need to be added to your planting hole as well to prevent Blossom End Rot, especially if you are growing in containers.
Once your tomato plants start to develop small tomatoes, an additional feeding of fertilizer is recommended. This can be a handful of the fertilizers mentioned above, or a liquid fertilizer diluted and sprayed onto the plants such as Neptune’s Harvest fish emulsion, Maxicrop Liquid Seaweed, or HastaGro 6-12-6 liquid fertilizer.
A product that we particularly like is Bluebonnet Farms Premium Organic Fertilizer. It contains many ingredients such as dried molasses, corn gluten meal, dried seaweed, alfalfa meal, and fish meal which are known to foster beneficial soil microorganisms. Update: current availability of this product seems to be poor in the area, unfortunately. We have heard that the private label Calloway’s (Cornelius in Houston) carries might be the same or similar, though – but have not yet confirmed.
Tip: One of the biggest mistakes in growing tomatoes is going overboard on fertilizers. High nitrogen fertilizers such as chicken manure should only be added in small quantities. Adding these or a high number fertilizer like 30-30-30 is a recipe for gigantic plants and little or no tomatoes.
Transplanting
Properly hardened-off tomato plants should be transplanted into the ground 2-3 feet apart from one another, and planted as deep as possible (removing any foliage which will be underground). Several inches of the stem should be buried if possible, so only the upper branches of each tomato plant are above ground. The fine hairs on the stem of a tomato plant will produce roots when buried, providing a much stronger, healthier root system.
Tip: Water your tomato plants just before taking them out of the pots and planting in the ground, and then water them again, getting the surrounding soil moist. Plant on a cloudy day, or in the afternoon or early evening so that your plants will have one night to acclimate themselves before they are hit with full sun.
Water Water Everywhere
After all the time and effort you have invested in your garden, don’t kill your tomato plants with kindness! Tomato plants should be watered well when transplanted, again after 2-4 days depending on the weather, and then if you have prepared your beds as described above, should only require 1-2 inches of water once per week early in the season, provided there is no significant rain. The best judge of whether your tomato plants need water is your finger. Dig your finger into the soil. If it is wet at a depth of 2-3 inches, then it does not need water.
If you want to baby your tomato plants, don’t let them go to bed wet! Tomato plants should ideally be watered in the morning or early afternoon using soaker hoses which apply water where it’s needed — the roots — and not where it isn’t — the leaves. If watering by hand, use a watering wand to apply water to the soil line, rather than wetting the leaves. If tomato plants get wet in the evening, there won’t be a chance for the sun to dry off the leaves, leaving your tomato plants vulnerable to fungal and bacterial infections.
Fungus is Anything but Fun
The most commonly heard buzzword in tomatoes is “disease resistant”. But the diseases which run rampant in S.E. Texas include fungal foliar diseases such as Early Blight, Septoria Leaf Spot, as well as Anthracnose fruit rot, Bacterial Spot, and Bacterial Speck. At this time, there are few desirable tomato varieties available which protect against these conditions.
Fortunately, applying a thick layer of mulch, proper watering, sanitary gardening practices, and weekly application of an anti-fungal spray can keep these problems at bay long enough to have a fantastic harvest.
Don’t Forget the Mulch
The best preventative measure you can take to keep fungus from splashing onto your leaves when the next monsoon rainstorm passes through, as well as regulating moisture on hot days, is a 2-3 inch thick layer of mulch. Some good choices for mulch include:
- Dye-free shredded pine bark mulch (not super-black or super-red)
- Wheat straw (if you can find it)
- Shredded leaves (not black walnut!)
- Grass clippings (if you have not used ‘weed and feed’ in the last 3 months)
- Shredded non-glossy newspaper (water immediately to prevent it from flying away)
Tip: Mulch should not touch the stems of your plants, or it may encourage stem rot. If you are installing soaker hoses, do so before installing mulch and tomato cages.
Support Your Local Tomato
Most of our preferred tomato varieties have an indeterminate growth habit which means they grow up to be free-spirited 5-8 feet tall plants. Some of our cherry tomato plants can even reach 10-12 feet. The quaint 3-4 foot conical tomato cages at major retailers just will not do.
Texas Tomato Cages are the Cadillac of tomato cages, as they are very sturdy, last forever and can be folded for easy storage, but their price ($26 each shipped) may be out of reach for many readers. You can make your own cages out of Concrete Reinforcing Wire which have large holes for easy access to the plants, if you don’t mind rusty cages.
I recommend building cages from galvanized fence. Because the holes are too small to reach through, I use 2 lengths of wire to keep a gap of approximately 8 inches where the ends meet so that the plants and fruit can be easily reached. Other solutions include staking, the Florida weave, and cages made from PVC pipe.
For a complete selection of support methods, see our Support Your Plants article.
Tip: Even though you’ll be pretty beat after planting your tomatoes, don’t wait more than a week or two to install your cages or support system. Tomato plants grow fast, and the legs on your stakes or cages could disturb the roots.
Harvest Early, Harvest Often
It is a myth that tomatoes must be left on the vine until ripe to develop the best possible flavor. We have found that tomatoes that are harvested at first blush and ripened indoors are almost indistinguishable from ones that are left on the vine until ripe.
Considering the temptation that ripe tomatoes offer to mockingbirds, squirrels, stink bugs, and other pests, why take the chance? Just be careful not to damage other fruit or break branches in the process of harvesting.
Trivia: Researchers have found that the sugar and acid content in tomatoes actually decreases if fruit is left on the vine to full ripeness. The sugars begin to turn to starches and acidity is reduced, resulting in a more bland tomato.
Links mentioned in this article: