
Container growing is a quick and easy way to expand your available gardening area even if you have poor soil or limited space in your yard to make garden beds. A container can be set anywhere you have good sun, whether it is on a driveway, a patio, or in the middle of your yard. Another distinct advantage is that it gives you the ability to safely set plants out earlier, because they can be more easily protected by moving in the event of a late freeze or frost. Containers are also practical for those who move frequently or live in apartments or condos.
Also, container growing is a good alternative for those who are battling various soil problems, and losing the battle. The primary soil problem in Texas tends to be root knot nematodes. Less prevalent are bacterial wilts, and verticillium and fusarium (systemic fungal diseases).
Suitable container sizes and example varieties
- Indeterminate – 15 gallon preferred (10 gallon at least) – Cherokee Purple, Black Cherry, Sun Gold, Green Giant, Arkansas Traveler
- Compact indeterminate/determinate/semi-determinate – 5 to 10 gallon – Picardy, Rutgers, Break O’Day, Kimberly, Bloody Butcher
- Dwarf/tree-type/compact determinate – 5 to 7 gallon – New Big Dwarf, Lime Green Salad, Citron Compact, Golden Dwarf Champion, Extreme Bush, Taxi
- Micro/mini – 2 to 3 gallon – Red Robin, Tiny Tim
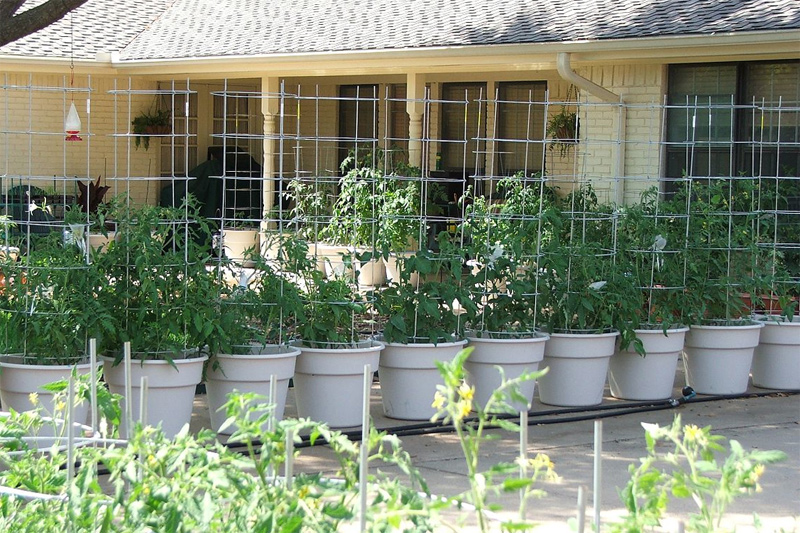
(Indeterminate plants in 15 gallon containers with 18″ diameter, 6′ tall Texas Cages, early in the season – many indets will eventually end up growing past the tops of those cages )
Larger containers are preferable in our hot climate because it cuts down on watering and it also makes for a more stable planting that is less likely to tip over in a storm.
I have found ANY variety can be successfully grown in a container, especially if the container is an adequate size for the plant. I generally avoid 5 gallon buckets and the like for indeterminate varieties and don’t generally recommend them as a “best” practice in our climate. However, it can be done if you are willing to keep up with the high watering and feeding requirements that will result from growing large plants in small containers. I’ve found that much better results are obtained from using a 15 gallon container or larger (10 gal minimum), and prefer to save the 5 gal pots for dwarves or compact determinates.
Cherry types are also good for containers (use 10 gallon minimum) because they are much less susceptible to blossom end rot (BER) than larger fruited varieties.
Mulching
I recommend mulching as it helps to limit splashback of fungal spores from the potting mix onto foliage. It also helps to keep the roots cool and moist, and cuts down on both frequency and amount of watering. My preferred mulch is wheat straw, applied 3-4″ thick. Do not pile it right against the stem, though — leave about an inch or two gap. I particularly like wheat straw because of the light color and hollow structure, which makes an excellent insulator. Shredded leaves and pine straw are other favorites. Shredded paper (non-glossy) can also be used, but be sure to wet it after applying or it will blow away. I prefer to avoid colored paper, unless I know the dye used was soy based. Wood mulch or bark chips can also be used, but avoid the dyed mulches as the dark color will be more likely to absorb heat.
Watering
Containers should not be allowed to dry out completely, as this can cause BER and blossom drop. Don’t wait until your plants are wilting to water. Water every day if necessary, but do not overdo it. When the container starts to feel lighter and the soil is dry a few inches down, this is usually a good indication it is time to water. Also, don’t be tempted to water on a hot day just to cool off the roots, it may cool them off, but it will also smother the plant (roots also like oxygen) and can lead to root rot and any number of other problems.
Using larger containers and mulching can cut down drastically on the time spent performing this task. Water the container and not the foliage. Wetting the foliage unnecessarily can contribute to foliar fungal disease (like Early Blight and Septoria Spot), which can frequently be a problem in our area. Also, water in the morning or early afternoon if you can so that any water that has splashed onto the foliage has a chance to evaporate before the sun sets.
Container color
For our hot climate, containers in light or neutral colors are generally best so the roots don’t bake. I prefer to use white containers, and avoid the use of black.
Suggested container mixes
The use of dirt dug up from your yard, cheap bagged topsoil (frequently lots of rocks, sand, and “mystery” dirt), poor quality potting soils, or bagged mix labeled “garden soil” is not recommended. Nor is the use of excessive amounts of sand, because of the small particle size. Excellent drainage is particularly important in a container, which is why I prefer a peat based mix. Bark fines or finely shredded landscaping mix can be added to this as well to stretch it out.
The compressed bales of Pro-Mix are a favorite of mine, but are becoming increasingly hard to find in the area. Alternatives include Jungle Growth, Metro Mix, and Miracle Gro potting mixes.
Note: Rocks or gravel added to the bottom of a container do not help with drainage. They can even inhibit drainage due to the physics of how soil in a container drains/wicks. This is a common and persistent gardening myth. However, they can be occasionally be useful to add weight to a container to cut down on the possibility of tipping.
My basic recipe for container mix
For every 5 gallons volume of potting mix, add:
- One cup of slow release fertilizer (10-10-10 or the kind labeled for vegetables or tomatoes). Or, TomatoTone per label instructions.
- 1/2 cup of Dolomitic/pelletized lime to help prevent BER — avoid hydrated lime as it can burn your plants
- 10% compost (optional)
- Bark fines — can be up to half of the volume of the mix if desired
Alternative recipe from Al (Tapla) for those who like to make their own completely from scratch
- 3 cu ft pine bark fines (1 big bag)
- 5 gallons peat
- 5 gallons perlite
- 1 cup lime
- 2 cups slow release fertilizer (Osmocote or similar)
- 1/2 cup micro-nutrient powder or 1 gal composted manure
Can potting mix be reused?
While there is no hard and fast rule, I generally prefer not to reuse container mix more than once. If reused, it should be turned over to help bury any fungal spores on the surface, and re-amended (see above recipe for container mix).
Ongoing Fertilization
I prefer to add a little more slow release fertilizer once I see significant fruit set, and also every couple of weeks or so once the plants get large. Alternatively, Miracle Gro or the equivalent can be periodically used at half-strength. So can TomatoTone or any number of products. The important point is that plants in containers require more frequent fertilization because of all the watering involved, which tends to deplete the container mix.
Fertilizers provide three primary nutrients to plants, plus many micronutrients. The three primary nutrients are Nitrogen (N), Phosphorous (P), and Potassium (K). Nitrogen produces lush, green foliage. Phosphorous is vital for producing a healthy root system to support the plant. Potassium promotes flower and fruit development and is vital for maintaining growth.
Support and stability considerations
It can sometimes be a challenge to properly support a container planting, but can be done. Methods I prefer include the use of a small (18″ diameter) Texas cage placed inside of a large container, a tall 6-8 ft stake, or a cage made of concrete reinforcement wire (CRW) cut to fit inside the container (a small stake may need to be added to attach the CRW cage to for stability).
High winds can be a problem in our area and can cause even a large container to tip over, especially if it is a large indeterminate plant, top heavy and loaded with fruit. It may seem counterintuitive, but right before an impending storm, I prefer to water all my containers if they are a bit on the dry/light side. This helps to make them heavier and less likely to tip over. If your potting mix is light and free-draining, this occasional “overwatering” shouldn’t be a problem. Containers can also be pushed together as a unit to help prevent tipping. Yet another way to cut down on the possibility of tipping is to drive a tall stake next to the pot (or though the bottom of the pot).
Grow Bags
Grow bags are an inexpensive alternative to hard sided containers and are also much easier to store. They can also be reused, especially if you take good care of them. However, they can be more susceptible to tipping, so keep that in mind before deciding to use them. One way to make them more stable would be to run a long pole/dowel through the handles of multiple bags to help keep them together as a unit. They could also be staked. For a grow bag source, see: GrowOrganic.com
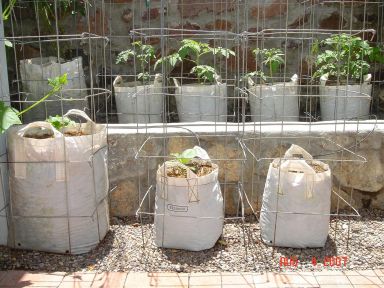
(Grow Bag image courtesy of Michael Volk in El Paso, TX)
Earthboxes™
I don’t use Earthboxes, but many do and are pleased with the results. If you use them, be sure to follow the instructions exactly, because every instruction has a specific purpose in ensuring the best results. Use a peat based potting mix like Pro-Mix or Jungle Growth. The mix needs to be light and fluffy to ensure proper upward wicking from the water reservoir below. Also, be sure to put the cover on as instructed so that the system remains sealed and the fertilizer strip you’ll apply per instructions does not get too quickly released into the mix due to rain. Cover should be white side up to help keep the roots cool in our hot climate. Some EB users will also add a strip of dolomitic lime as well, and it is generally recommended to cut down on the possibility of BER. When the plants get large, the EB water reservoir might have to be filled at least once a day in a hot climate.
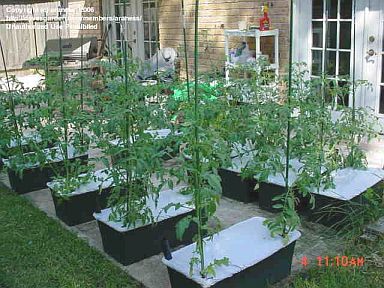
(Earthbox image courtesy of Araness in Orange, TX)
Earthboxes and any number of accessories designed to work with the system can be purchased from the company who sells them, including plant supports and automated watering systems which attach to a faucet. The quality of the products is good, but the cost can really add up if you are growing a significant number of plants.
You can make your own EB type containers to cut down on the expense, and so that you can have a larger water reservoir than standard to cut down on the need to fill it so frequently. Instructions here: http://www.josho.com/gardening.htm